


plastic nature APPLIQUÉ
Unleash your creativity and transform single-use plastics into vibrant, stitched works of art inspired by the natural world. Plastic Nature in Reverse Applique is a joyful, hands-on course that guides you through every step of turning everyday trash—like plastic bags, bubble wrap, and bread bags—into layered, shimmering art pieces using reverse appliqué, machine stitching, and meditative hand embroidery.
Across five immersive chapters, you’ll learn how to source and prepare materials, design your own stitch-ready patterns from imperfect nature photos, and bring them to life through playful layering, free-motion stitching, and careful handwork. You’ll explore techniques for building depth, texture, and personality—while embracing the unpredictability and magic of working with plastic waste.
This course is perfect for artists, makers, and curious beginners who want to merge environmental consciousness with creative exploration. No fancy equipment needed—just a sewing machine, some scrap plastic, basic tools, and an open mind. By the end, you’ll not only have a finished piece of art—you’ll see trash in a whole new light.
What you’ll learn
-
🌸
How to turn discarded plastic into expressive, nature-inspired art
-
🌼
Ways to turn quick, imperfect photos into compelling design references
-
🌺
Best tools, substrates, and techniques for stitching with plastic
-
🍁
How to trace, sketch, and simplify images into dynamic stitched compositions
-
🌵
Reverse appliqué methods to cut, reveal, and build layered designs
-
🌿
Free-motion machine stitching and intuitive thread painting techniques
-
🍄
Meditative hand embroidery methods to add texture and detail
-
🐠
Creative options for finishing and presenting your final artwork
-
🌎
Join me on this transformative journey—and discover the unexpected beauty hiding in your trash.
What’s inside

chapter 4
Lesson 1 - Let’s stitch and play! In this lesson, I’ll show you how I use free-motion stitching and thread painting to bring plastic art to life. From bold outlines to delicate textures, I layer thread like paint—sometimes precise, often improvised. We’ll explore blending, puffiness, and even stitching through bubble wrap. It’s playful, intuitive, and totally yours—so let the thread lead the way!
Lesson 2 - Welcome to my favorite part—meditative hand stitching! In this lesson, I’ll show you how simple stitches like running, seed, and French knots can add texture, detail, and personality to your plastic art. Whether you're enhancing machine work or going all-in by hand, it’s all about slowing down, trusting your intuition, and letting the thread guide you.

chapter 1
Lesson 1 - Discover the wild, colorful possibilities of turning single-use plastic into nature-inspired art! From ocean creatures to blooming flowers, I’ll show you how to transform everyday trash—like chip bags, bubble wrap, and even found tape—into layered, stitched works of beauty. Grab your scraps and let your imagination lead the way—because plastic art is full of surprises!
Lesson 2 - Think your photos need to be perfect to inspire great art? Think again! In this lesson, I’ll show you how I turn quick, messy nature snapshots into strong compositions for plastic art. From cropping in Photoshop Elements to embracing blurry or chaotic images, you’ll learn how to spot potential and shape it into something beautiful.
Lesson 3 - Before we dive into stitching, let’s talk materials! In this lesson, I’ll show you the plastics I love (think chip bags, bubble wrap, and bread bags), the best substrates to stitch on (like Pellon and plastic mailers), and all my favorite tools. You likely have most of it already—now let’s set you up to turn trash into stitched, shimmering art!
chapter 2
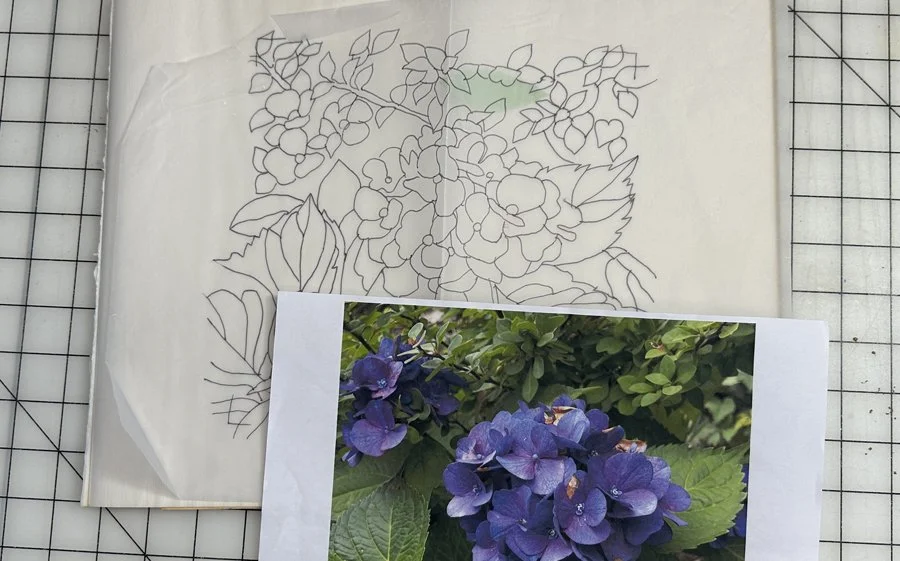
Lesson 1 - Learn how to turn a nature photo into a simplified, stitch-ready sketch for your reverse appliqué artwork. I’ll guide you through choosing, cropping, and tracing your image—then refining it into a clean, flowing design that’s perfect for machine stitching and leaves room for hand-stitched magic later. It’s not about copying—it’s about creatively reimagining what you see!
Lesson 2 - Time to bring your sketch to life by layering plastic! In this lesson, you’ll learn how to “paint” with color, texture, and transparency using everyday materials like plastic bags and wrappers. I’ll show you how I build up layers—from background greens to glowing highlights—while embracing surprise, play, and a little plastic magic.

chapter 3
Lesson 1 - Let’s stitch it down and tear it up! In this lesson, I’ll show you how I use free-motion stitching to follow (and sometimes freestyle!) my sketch lines, choosing colorful variegated threads to keep things lively. Then comes the satisfying part—tearing away the tracing paper. It’s messy, magical, and sets the stage for the reverse appliqué to come!
Lesson 2 - Slice, reveal, repeat! In this lesson, we dive into the magic of reverse appliqué—cutting away layered plastic to uncover vibrant colors and hidden textures beneath. With sharp scissors and trusty tweezers, I’ll show you how to reveal details, add depth, and bring your stitched image to life—one careful snip at a time.

chapter 5
Lesson 1 - Finishing your plastic artwork is part of the creative fun! In this lesson, I’ll walk you through my favorite techniques—from gluing onto canvas or board, to wrapping and stitching edges, to painting the sides for a polished look. Whether you go neat or messy, framed or raw, you’ll discover lots of ways to make your piece feel complete and ready to shine.

FAQs
How can I safely clean and prepare plastic for stitched art projects?
Only minimal cleaning is usually required. Plastic that used to hold food items, just needs a quick rinse. I usually turn the bags inside out, give them a hot water rinse and set aside to air dry. Items that help messy food items may need a soapy sponge, then a rinse and air dry. Plastic that held dry goods usually only needs a good shake off, unless there’s dust that would probably need to be rinsed.
How do you ensure the durability and longevity of art pieces made from plastic?
The key to keeping them in great shape is very similar to other art. Keep out of direct sunlight. Keep clean, dust or wipe off as necessary. Store with care, stack your art on canvas or cradle board flat against one another, face to face, against a flat, stable surface like a wall. Place a large piece of simple cloth, like a muslin or undyed cotton, or a large plain sheet of paper between the two surfaces. It’s best to have the art lifted off the ground as well, in case of spillage or flooding. That’s it!
What basic sewing techniques are essential for beginners?
For machine stitching it is important to know your machine. You'll need a very basic sewing machine, no bells and whistles required. Your machine needs to do a straight stitch, and have the ability to put down the feed dogs. Practice some basic stitching on a piece of cloth just so you know how your machine works.
For hand stitching all you need to know is how to do a running stitch and a seed stitch. Both are very basic techniques, one stitch at a time. There is a video in this course teaching you how to do it.